Web Views
IINA provides multiple ways to create custom user interfaces, such as StandaloneWindow, Sidebar, and Overlay. All these methods are based on Webviews.
Therefore, you need prepare a HTML file with CSS (and perhaps JavaScript) to create the custom UI. This is done by calling the loadHTML() method in each of those modules. The HTML page should be included in the plugin package, and its path related to the plugin root directory should be supplied to the loadHTML() method.
The HTML page can contain inline <style> or <script> tags, or external files. The external files can be either local files or remote URLs. In case of local files, the path should be relative to the HTML page itself.
Simple Mode
Writing a full HTML page is not necessary if you only need a simple UI. For example, you may want to display some statistical information in the overlay with casual styling. IINA provides a simple mode that allows you to set the content (HTML) and styling (CSS) of the webview directly from the plugin script.
Under simple mode, you don't need to prepare a HTML file or call loadHTML.
To use this mode, you can call the simpleMode() method, then use setStyle() and setContent() to set the CSS and HTML content, as shown in the example below. Please see the documation of each method for more details.
const { overlay } = iina;

overlay.simpleMode();
overlay.setStyle(`
  body {
    color: green;
  }
`);
setInterval(() => {
  overlay.setContent(`
    <p>Current time: ${core.status.position}</p>
  `);
}, 1000);
The following sections, however, will focus on more complicated cases, where javascript is used to create dynamic and interactive user interfaces.
Communication between a webview and the plugin
Data exchange is inevitable for interactive user interfaces. For example, if you want to display live comments on the video, you may need to fetch the comments in real time, and synchronize with the video playback.
A critical concept to understand is that the webview is a separate process from the main IINA process. This means that the webview cannot directly access the plugin script's JavaScript context, and vice versa. Therefore, JavaScript code in the webview cannot call the IINA API directly. Instead, the plugin script must provide a way for the webview to communicate with it.
In IINA, the communication between the webview and the plugin script is done via the postMessage() and onMessage() methods.
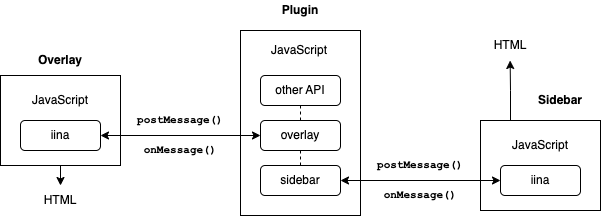
For the plugin scripot, these methods are available in each API module (overlay, sidebar, standaloneWindow).
For the webview, there is a global iina object that provides the same methods.
For example, for the overlay:
- In the plugin script, you can call
overlay.postMessage()to send a message to the overlay webview, andiina.onMessage()in the webview to handle the message. - In the overlay webview, you can call
iina.postMessage()to send a message to the plugin script, andoverlay.onMessage()in the plugin script to handle the message.
If you have multiple webviews, for example, a sidebar and an overlay, and you want them to communicate with each other, you must first send the message to the plugin script, and then the plugin script can forward the message to the other webview.
The signature of these methods are unified:
postMessage(name: string, data?: any): void;
onMessage(name: string, handler: (data: any) => void): void;
nameis the name of the message. It is used to distinguish different messages.datais the data to be sent. It can be any JSON-serializable object, which means that it should be a string, number, object or array that does not contain anyDate,RegExp,Map,Set,Function,Symbol,BigInt, orArrayBufferobjects, and does not contain any circular references.
The onMessage() handler is called when a message with the specified name is received, and the data parameter is the data sent by the postMessage() method.
Example: Player Controls in Sidebar View
We now look at a simple example to demonstrate how to use the webview messaging API. Suppose that we want to add a text label in the sidebar view to display the current time of the video, and a button to toggle the play/pause state. To do this, the sidebar webview should have HTML code like:
<div id="time">00:00:00</div>
<button id="play-pause">Play</button>
Next, we need to add JavaScript code to update the time label and the button text. The webview cannot directly get the status from IINA API, so we post the data from the plugin script:
// Entry Script
const { core, sidebar } = iina;

function postUpdate() {
  sidebar.postMessage("update", {
    time: core.status.position,
    paused: core.status.paused,
  });
}
We also need to post the message when the video time and pause status changes. One way to do this is to post the message periodically, e.g. every 0.5 seconds:
// Entry Script
setInterval(postUpdate, 500);
In real-world applications, you may use a more sophisticated approach to update the UI only when necessary,
such as listening to mpv's position and pause property change events.
Next, we need to add a corresponding onMessage() handler to the webview to actually update the time and button text in the user interface:
// Sidebar Webview
iina.onMessage("update", ({ time, paused }) => {
  document.getElementById("time").innerText = time;
  document.getElementById("play-pause").innerText = paused ? "Play" : "Pause";
});
Finally, we need to make the button work by adding a click handler that posts a message to the plugin script:
// Sidebar Webview
document.getElementById("play-pause").addEventListener("click", () => {
  iina.postMessage("toggle-pause");
});
And the plugin script can handle the message by calling the IINA API:
// Entry Script
iina.onMessage("toggle-pause", () => {
  core.togglePause();
});
Supporting Light and Dark Appearances
Your user interface should support both light and dark appearances.
This can be done by using CSS variables and the prefers-color-scheme media query.
For example:
body {
  color: var(--text-color);
}

@media (prefers-color-scheme: light) {
  :root {
    --text-color: black;
  }
}

@media (prefers-color-scheme: dark) {
  :root {
    --text-color: white;
  }
}
Since this is the standard way to support light and dark appearances, existing UI frameworks should work out of the box.
The background color for all webviews are transparent, so it will automatically adapt to the system appearance (following the window background). Normally you don't need to specify the background color in your CSS.
Enabling Interactions for the Overlay Webview
By default, the overlay is not interactive, which means that users cannot click on links or buttons, or select text.
This is because the webview can otherwise absorb all input events and interfere with the normal operation of IINA.
However, you can enable interactions for the webview by calling overlay.setClickable(true).
Next, you must specify which HTML elements are clickable by adding the data-clickable attribute to them.
For example,
<button id="open-btn" data-clickable>Clisk Me</button>
<input type="text" id="input" data-clickable />
Please don't overuse this feature, as the hit test for clickable elements is not very efficient, although the performance impact should be negligible for most use cases.
When using data-clickable with input controls, you should also consider the fact that
if the input field is focused, it will capture all key input events,
while the user cannot easily unfocus the input field by clicking outside of it.
Your JavaScript code should handle this situation correctly to avoid unexpected behavior.
For example, let the user click a button to submit the input,
or manually blur the input field after accepting the input.
When finished, you should call overlay.setClickable(false) to disable interactions for the webview.